No-Knead Rustic Bread: The Easiest Way to Fresh-Baked Goodness
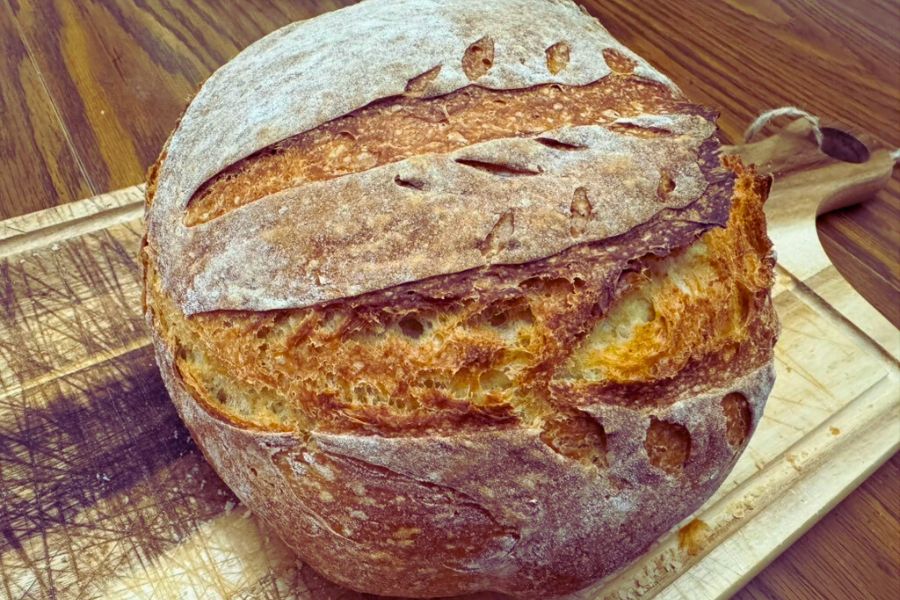
There’s something magical about pulling a golden, crusty loaf of bread out of your oven—and it’s even better when it requires minimal effort! This No-Knead Rustic Bread recipe is perfect for beginners and seasoned bakers alike. With just a handful of ingredients, you can create a beautiful loaf that tastes like it came from a bakery.
Disclosure: This post contains affiliate links. As an Amazon Associate, I earn from qualifying purchases at no additional cost to you. Thank you for supporting Makin’ Macon!
Equipment You’ll Need
- Mixing Bowl
- Wooden Spoon or Spatula
- Plastic Wrap or Beeswrap
- Parchment Paper
- Dutch Oven (Check this one out!)
- Oven Mitts
- Wire Cooling Rack
- Bread Knife
Ingredients
- 3¼ cups unbleached all-purpose flour
- 2 teaspoons salt
- 1 teaspoon honey or granulated sugar
- 1 packet active dry yeast (2¼ teaspoons)
- 1⅓ cups warm water (approximately 110°F)
Instructions
Step 1: Mix the Dough
In a large mixing bowl, combine the flour, salt, sugar, and yeast. Stir until everything is evenly distributed. Pour in the warm water and mix until a loose, shaggy dough forms. Don’t worry about perfection—a rustic look is the goal here!
Step 2: Let it Rise
Cover the bowl with plastic wrap or beeswrap and let the dough rest at room temperature for about an hour. During this time, the dough will double in size, creating those lovely air pockets that make artisan bread so delightful.
Step 3: Shape the Dough
Once the dough has risen, transfer it onto a generously floured surface. Gently fold the edges of the dough over itself a few times to shape it into a round ball. If the dough feels sticky, add a sprinkle of flour as needed.
Step 4: Preheat the Oven
Place your Dutch oven inside your oven and preheat both to 450°F. Let them heat up for about 20–30 minutes. This step ensures that your bread bakes evenly and develops that coveted crispy crust.
Looking for the perfect Dutch oven? Here’s one I have had my eye on!
Step 5: Bake the Bread
- Carefully remove the hot Dutch oven from the oven using oven mitts.
- Lift the edges of the parchment paper to transfer the dough into the Dutch oven.
- Cover it with the lid and bake for 30 minutes.
- Remove the lid and bake for an additional 10–20 minutes, until the crust is beautifully golden brown.
Step 6: Cool and Serve
Transfer the baked bread to a wire rack to cool. Let it cool for at least 30 minutes before slicing—this step is important to preserve the texture and flavor! Serve warm or toasted, and enjoy.
Lessons Learned (the Hard Way)
Through the chaos and calamity, I’ve learned a thing or two about life, love, and the pursuit of the perfect crust. Sometimes, you just have to roll with the punches—or in this case, the dough—and embrace the messiness of it all.
Sure, my bread doesn’t always turn out picture-perfect. There are days when the dough has a mind of its own or I forget a step (or two). But that’s what makes it special. It’s the laughter, the love, and the memories shared along the way that matter most.
With this recipe, though, even the most “catastrophe-prone” among us can succeed. Trust me—if I can do it, so can you!
Rise and Shine
As I sit down to enjoy a slice of warm, crusty bread (slathered in butter, of course), I can’t help but smile at the absurdity of it all. Life may be messy, unpredictable, and downright hilarious at times, but hey—at least there’s bread.
This no-knead recipe has become my go-to for those nights when I’ve run out of time but still want something homemade. And if bread isn’t in the cards, I always fall back on my trusty Your Choice Buns or Rolls—another kitchen lifesaver.
So here’s to embracing the chaos, savoring the imperfections, and finding joy in life’s delicious little surprises. As long as there’s bread in the oven and laughter in the air, everything will be just fine.
Remember, I’m always praying for you, even if I don’t know who you are!
No-Knead Rustic Bread
Equipment
- 1 Mixing Bowl
- Wooden Spoon or Spatula
- Plastic Wrap or Beeswrap
- Parchment Paper
- 1 Dutch Oven
- Oven Mitts
- 1 Wire Cooling Rack
- 1 Bread Knife
Ingredients
- 3¼ cup unbleached all-purpose flour
- 2 teaspoons salt
- 1 teaspoon honey or granulated sugar
- 1 packet active dry yeast 2¼ teaspoons
- 1⅓ cup warm water approximately 110℉
Instructions
- Mix the Dough: In a large mixing bowl, combine the flour, salt, sugar, and yeast. Stir until everything is evenly distributed. Pour in the warm water and mix until a loose, shaggy dough forms. Don't worry about it being too perfect – a rustic look is what we're aiming for!
- Let it Rise: Cover the bowl with plastic wrap or beeswrap and let the dough rest at room temperature for about an hour. During this time, the dough will double in size, creating those lovely air pockets that make artisan bread so delightful.
- Shape the Dough: Once the dough has risen, transfer it onto a generously floured surface. Gently fold the edges of the dough over itself a few times to shape it into a round ball. If the dough feels sticky, add a sprinkle of flour as needed.
- Preheat the Oven: Place a Dutch oven inside your oven and preheat both to 450°F. Let them heat up for about 20-30 minutes. This step ensures that your bread bakes evenly and develops that coveted crispy crust.
- Bake: Carefully remove the hot Dutch oven from the oven using oven mitts. Lift the edges of the parchment paper to transfer the dough into the Dutch oven. Cover it with the lid and bake for 30 minutes. Afterward, remove the lid and bake for an additional 10-20 minutes until the crust is beautifully golden brown.
- Serve: Once your bread is baked to perfection, transfer it to a wire rack to cool. Allow it to cool for at least 30 minutes before slicing into it. Then, serve and enjoy! Whether you're enjoying it fresh out of the oven or toasting up slices for breakfast, this homemade rustic bread is sure to impress.

